The Best Way to Tie Resistance Bands: Simple Tips for Effective Workouts
Updated: 6/23/24
Looking for the best way to tie resistance bands?
You’ve come to the right place!
I absolutely love working out with resistance bands, but over the years, I have also learned to respect those big ol’ rubber bands.
After a few times of tying them off wrong and having them come back and slap me somewhere on my body or, worse yet – my face – I have learned the best and worst way to tie a resistance band.
Another problem I had was when I tied my bands in a knot. After pulling on them when I was using them, the knot got tighter, and there was no way I was getting that out!
Then I could only use that band for 1-2 exercises – that pissed me off.
So, trust me, there are some ways of tying a resistance band that works and some ways that absolutely do not!
If you want to know more about the right way to tie a resistance band, keep reading.
I will show you step-by-step ways to tie your bands so that you don’t damage them and they don’t slap you in the face.
I’ll also give you some tips on how to choose the right resistance band for your fitness level and goals.
This post may contain affiliate links. As an Amazon Associate, I earn from qualifying purchases. This means I may earn a commission at no extra cost to you should you choose to make a purchase using my link.
What Are Resistance Bands
A resistance band is really just a big latex rubber band that comes in different sizes and thicknesses.
They are great for strength training, rehabbing, or stretching and can be used on all body parts.
So, if you’re looking for something more challenging than bodyweight exercises but not as hard on the joints as free weights, resistance bands are probably the perfect fit for you.
Types of Resistance Bands
There are several different types of resistance bands, and each is designed for certain exercises.
I think I own every style of band for a different reason.
Here are the most common ones:
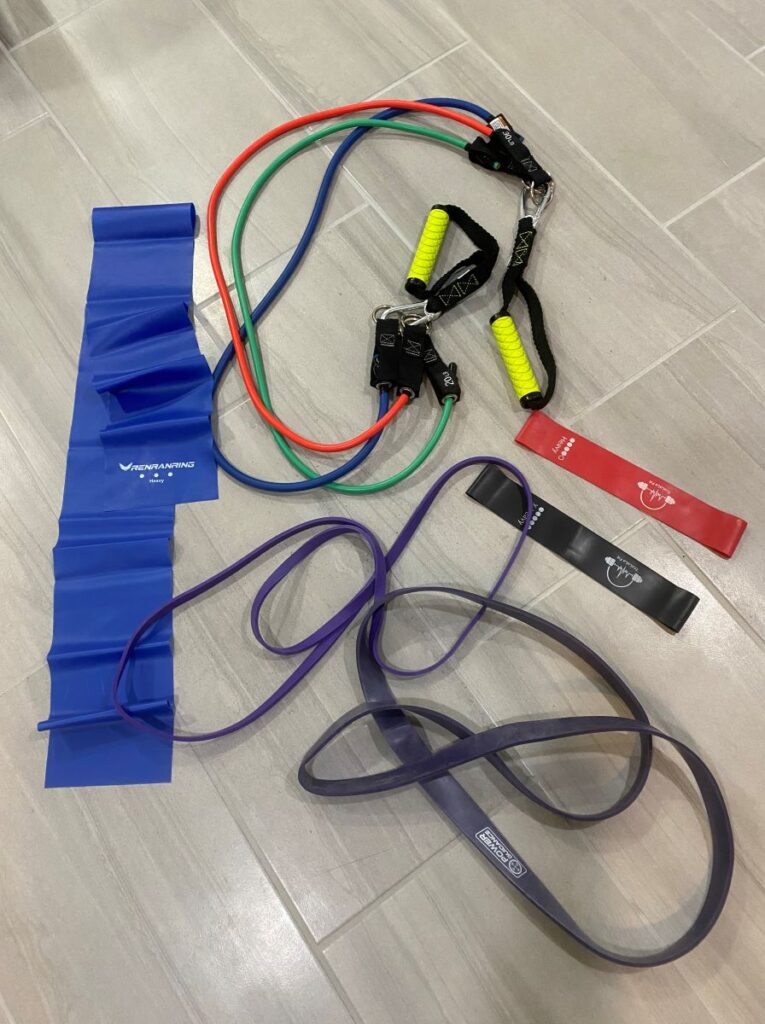
- Tube Bands are probably the most popular type of resistance band. They’re made of rubber and look like tubes with handles on either end. They’re great for upper body exercises like bicep curls and tricep extensions.
- Loop Bands: These are continuous loops that truly look like a giant-sized rubber band. They come in various sizes and thicknesses. Large loop bands are a heavier band that can be used to assist with pull ups or for upper arms and lower body exercises. Then there are the smaller loop bands, often referred to as mini bands or booty bands, and they are great for exercises like front squats, lateral walks, and glute bridge.
- Therapy Bands: These are flat bands that are the best resistance bands for anyone rehabbing an injury. They are typically used in physical therapy for rehab exercises. However, many older adults and beginners start with therabands. This is because they come in several different resistance levels and are great for exercises that don’t require much resistance.
Choosing the right type depends on your workout goals.

Preparing for Your Workout
Before you start tying your resistance bands, there are a few things you should consider to get the most out of your workout and avoid any possible injuries.
Choosing the Right Band
It’s important to choose the right resistance band for your workout.
Bands come in different resistance levels, and you should choose one that matches your fitness level and the exercise you plan to do.
I would encourage you to get a set of bands with different tensions, which will give you more options and allow you to adjust as you progress.
Here are some things to consider when choosing a resistance band:
- Resistance levels: Bands come in different resistance levels, ranging from light to heavy. Choose a band that offers enough resistance to challenge you but doesn’t strain your muscles.
- Length and width: Bands come in different lengths and widths. Consider the exercises you plan to do and choose a band that’s long enough and wide enough to accommodate those exercises.
- Material: Bands are made from different materials, including latex, rubber, and fabric. Choose a band that’s comfortable to use and doesn’t cause any skin irritation.
Safety Tips Before You Start
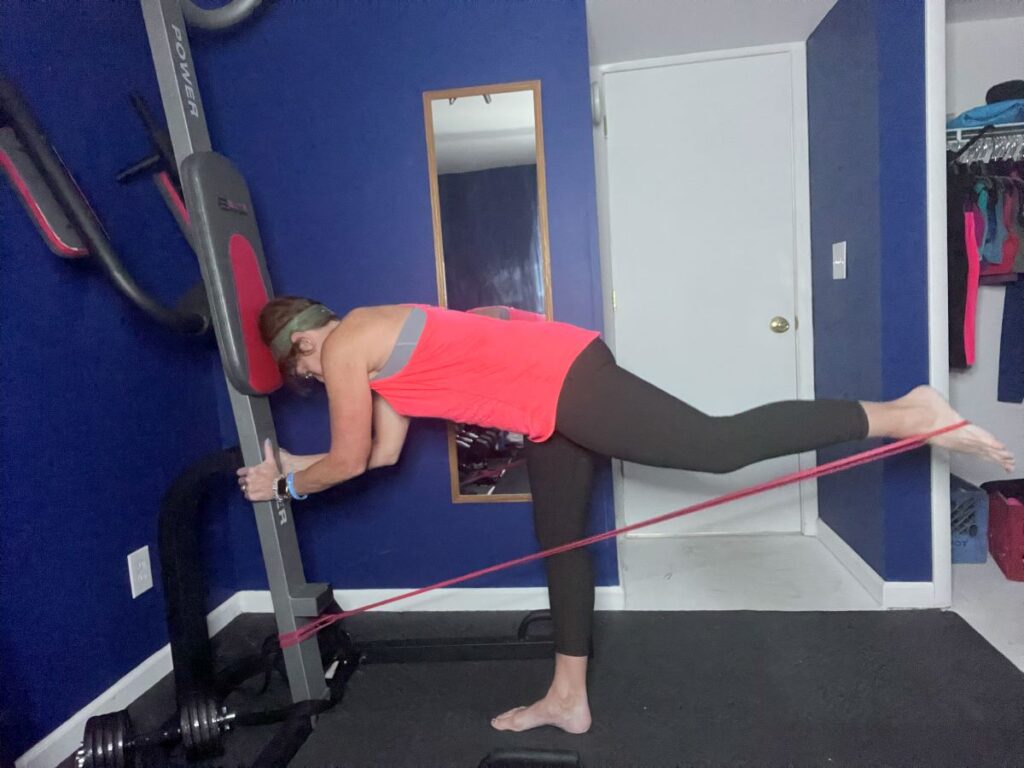
Safety is so important when using resistance bands.
- Inspect the band for any signs of damage: Before using your resistance band, inspect it for any signs of damage, such as tears or cracks. If you find any damage, don’t use the band and replace it with a new one.
- Find a band that matches your fitness level: Using a band that is too light will not do you any good, but a band that is too heavy will screw up your form and can possibly hurt you.
- Tie the band correctly: As I mentioned above, this is key. We will discuss this further in this article.
- Use proper form: Proper form is very important so that you don’t get injured and get the most out of your workout. Avoid any jerky movements that could cause injury.
- Start slow: If you’re new to resistance band workouts, start slow and gradually increase the intensity. This will help you avoid injury and build up your strength over time.
READ MORE: How to Correctly Use Resistance Bands For Beginners.
Tying Techniques
Tying the bands incorrectly can cause injury to the band or, more importantly, to you.
If you tie your band into a simple knot and then pull on the band, the knot becomes tighter.
This makes it very difficult or next to impossible to get the knot out.
Most people will end up cutting the resistance band or using a chemical or a tool that will weaken or destroy it.
Either way, the band may not last long.
This could cause you to either quit using them or force you to buy more bands.
I don’t want you to waste money on buying more bands, and I certainly don’t want you to quit using them because they are too difficult to tie.
Below, you’ll find different ways to tie your resistance bands, which will help with your workout.
Slip Knot for Quick Release
The Slip Knot for Quick Release is perfect for different workouts.
It’s secure yet easy to undo but it does need to be done correctly.
If not, it will most likely come undone and snap back at you.
Trust me, that hurts!
First, find a pole that is round vs square. This will prevent the band from weakening.
When you put more force on the areas that come into contact with square edges, it can decrease the life expectancy of the band.
However, if you only have a square pole, make sure that the edges are smooth.
Second, make sure that the pole is solid and stable.
If you’re tying your band to a piece of furniture, make sure it’s heavy and doesn’t move easily.
Think more of a couch or maybe a basketball pole.
You can use a spindle on your stairs, but again, make sure that it’s strong and won’t break.
- Start by wrapping your band around the pole.
- Be sure to have a smaller side and a longer side.
- Take the shorter side over the top of the longer side.
- Then, bring it under the longer band and through the hole.
- Take the smaller side again and bend it in half. Again, take it over the longer band.
- Bring it back under and through the hole.
- Pull back on the band. You will see that it is not going anywhere!
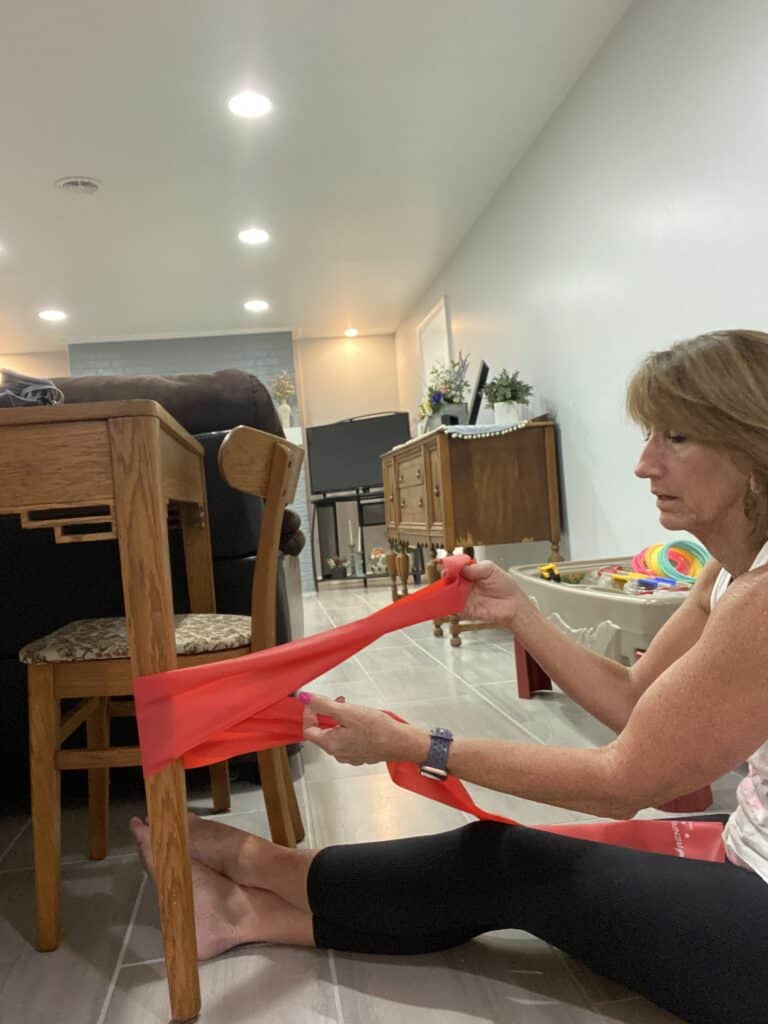
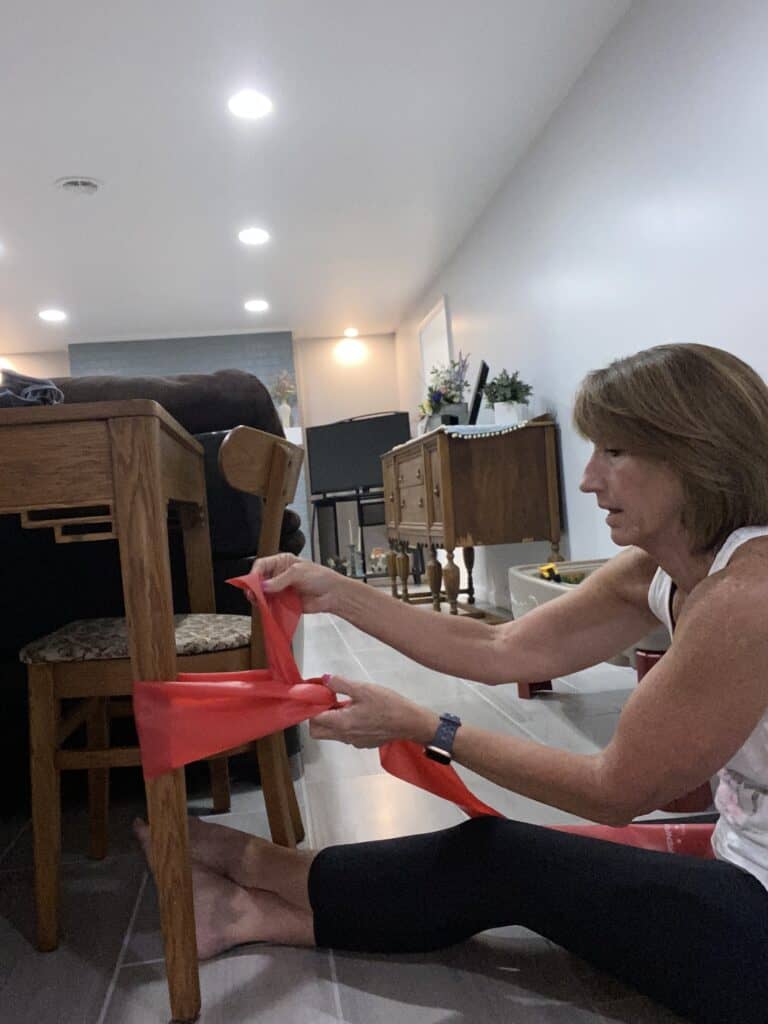
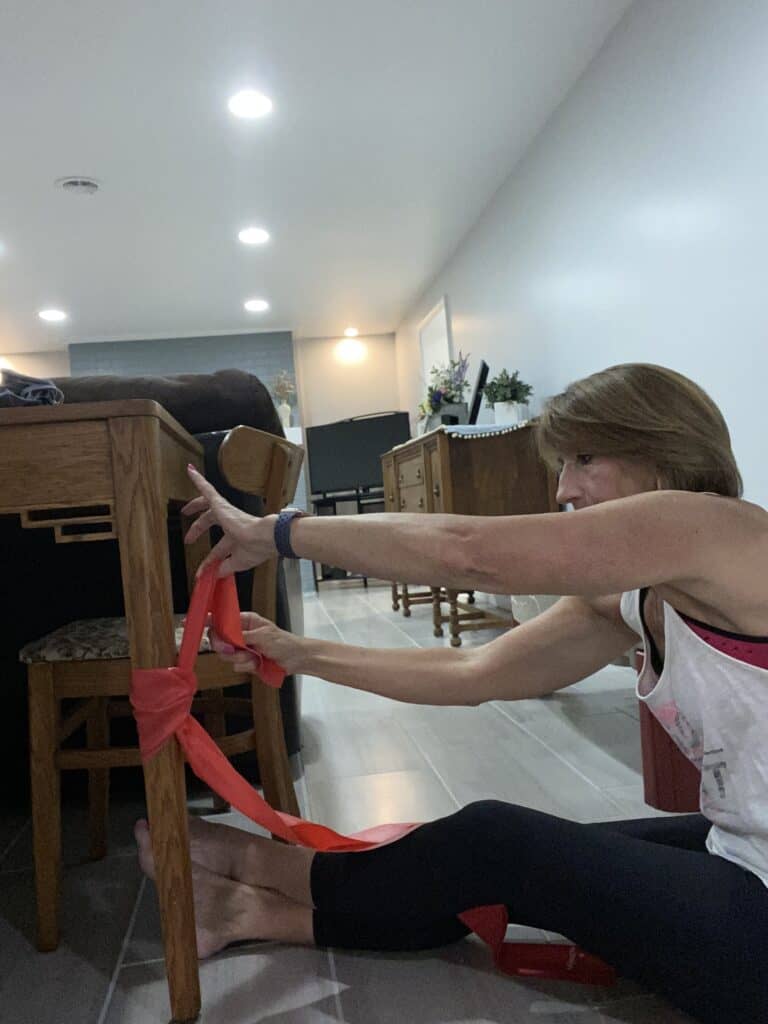


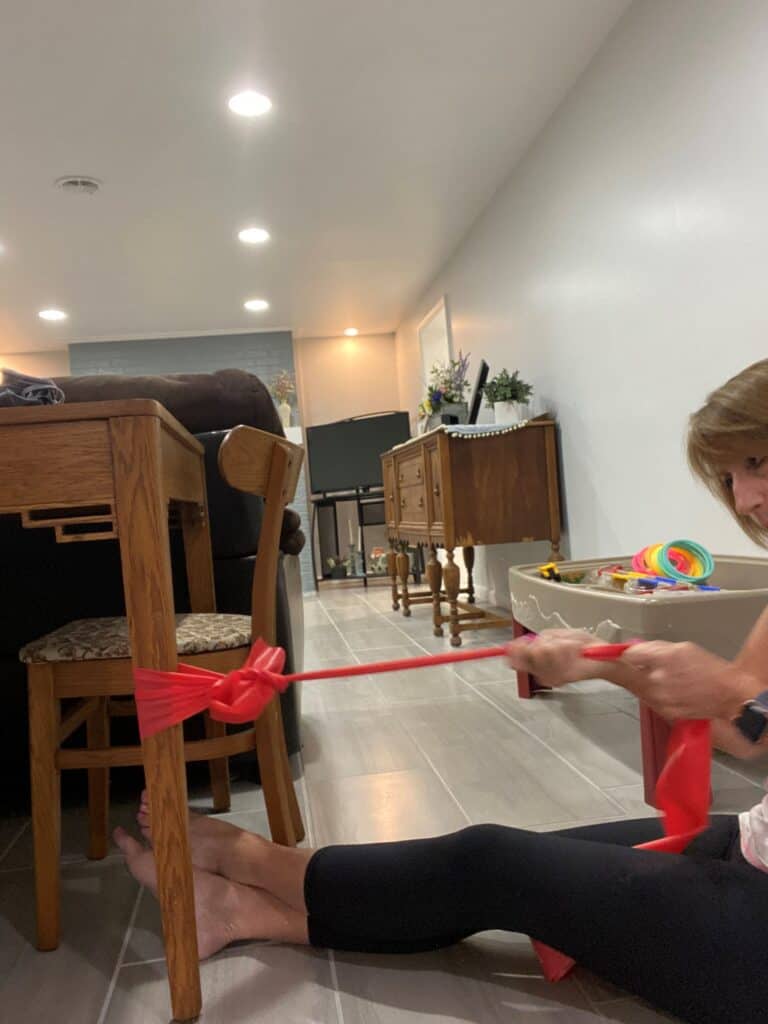
When you are done, simply pull the bent or shorter side, and it will come undone into a flat band again.
This is the best way to tie a flat theraband.
READ MORE: How to Tie a Theraband | Cardioflex Therapy Davie FL
Tying Theraband to Use as a Loop Band
If you don’t have a loop band, don’t worry you can turn any theraband into a loop band.
It’s a good idea to tie the band correctly because if you tie the theraband with a knot, you probably won’t be able to undo it, leaving it the same size forever. ( I may know this from experience!)
- Take the flat band around your legs.
- Hold the two end pieces in each hand.
- Loop or tie the band.
- Then, take one side of the loose end and bend it.
- Take the bent side, put it over the other end, and then back under and back through the hole.
- Pull on the two ends to tighten.
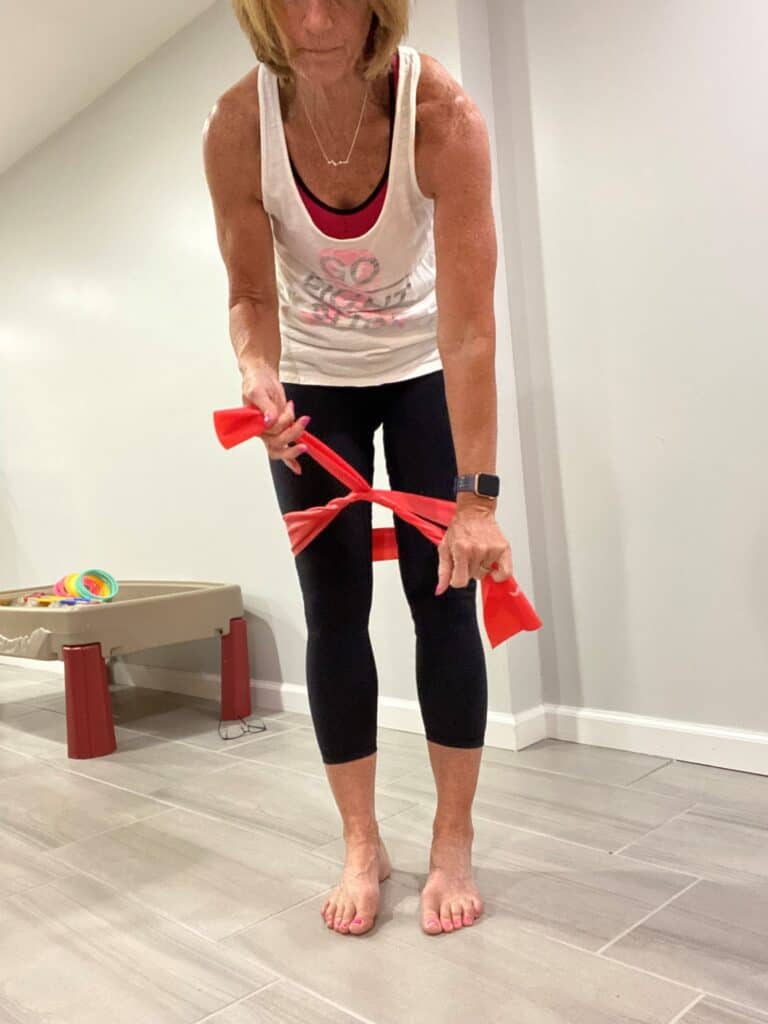
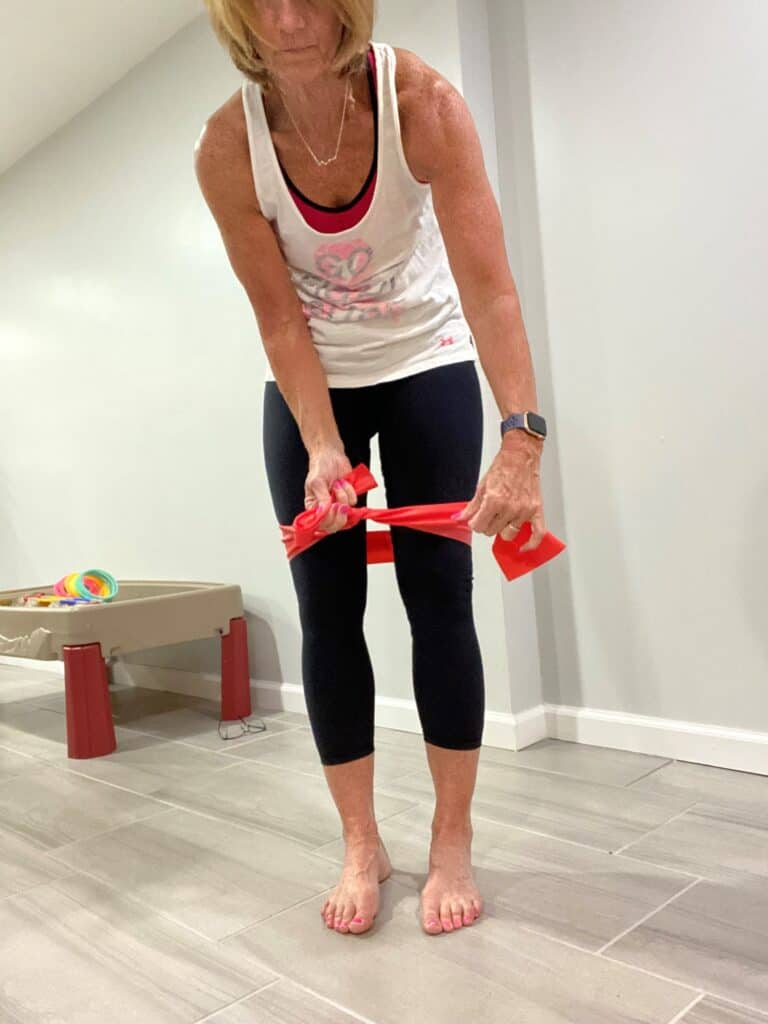
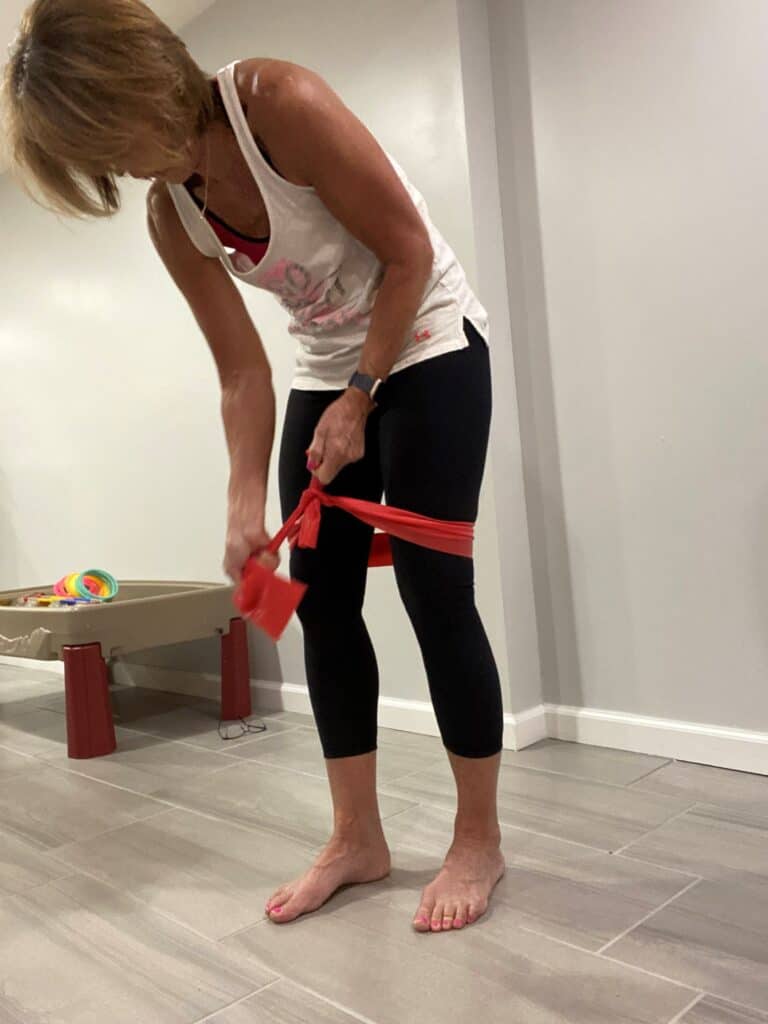
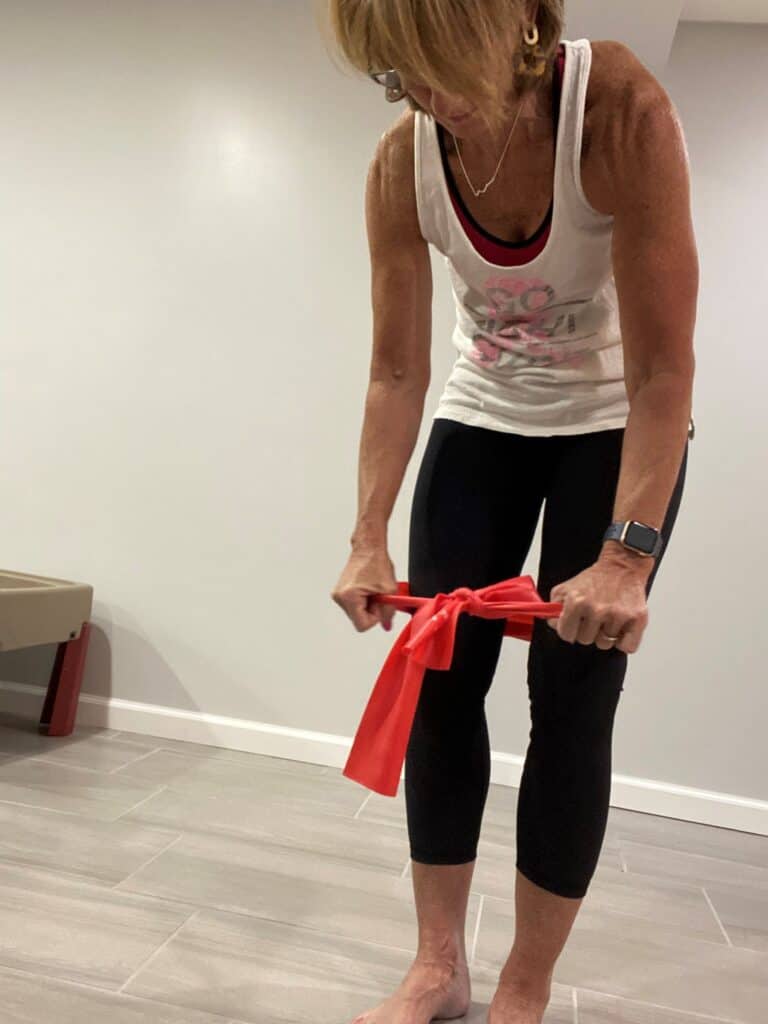
When you are done, simply pull the bent or shorter side, and it will come undone into a flat band again.
Securing a Loop Band
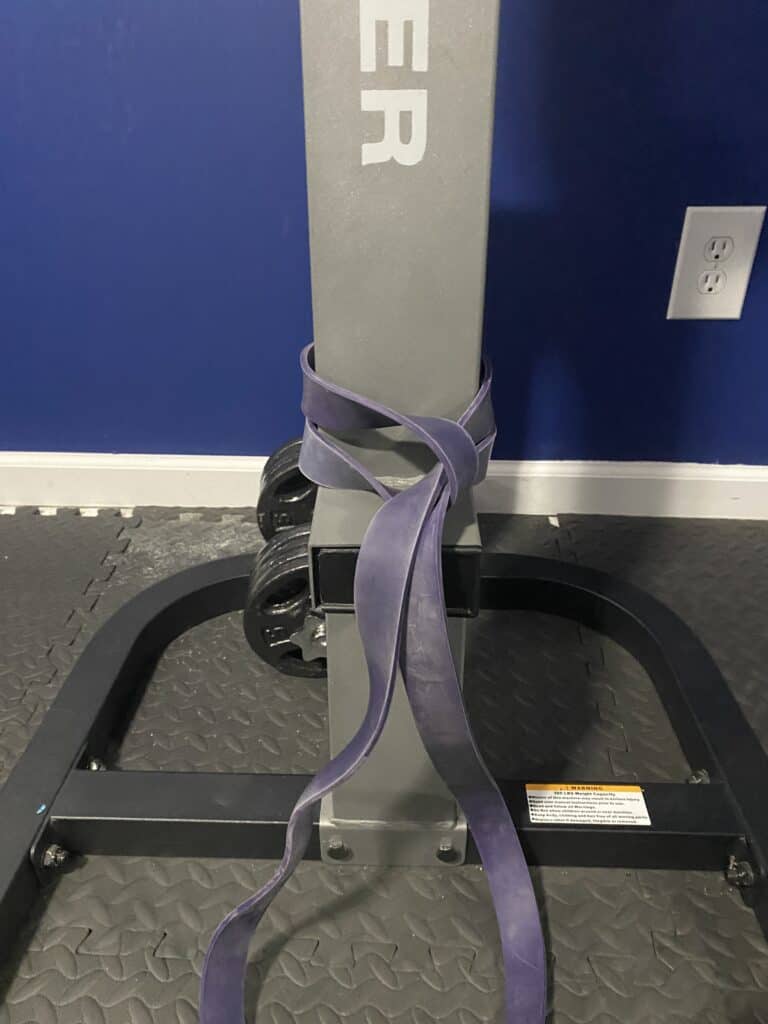
Sometimes, you need to knot your loop band around a pole or an O-ring.
To do this:
- Take your loop band around a pole again – it is best if it is round, but you can loop it around a square pole if you need to.
- Pull one side of the band through the hole of the band on the other side of the pole.
- Pull tight.
Tying Loop Bands Together
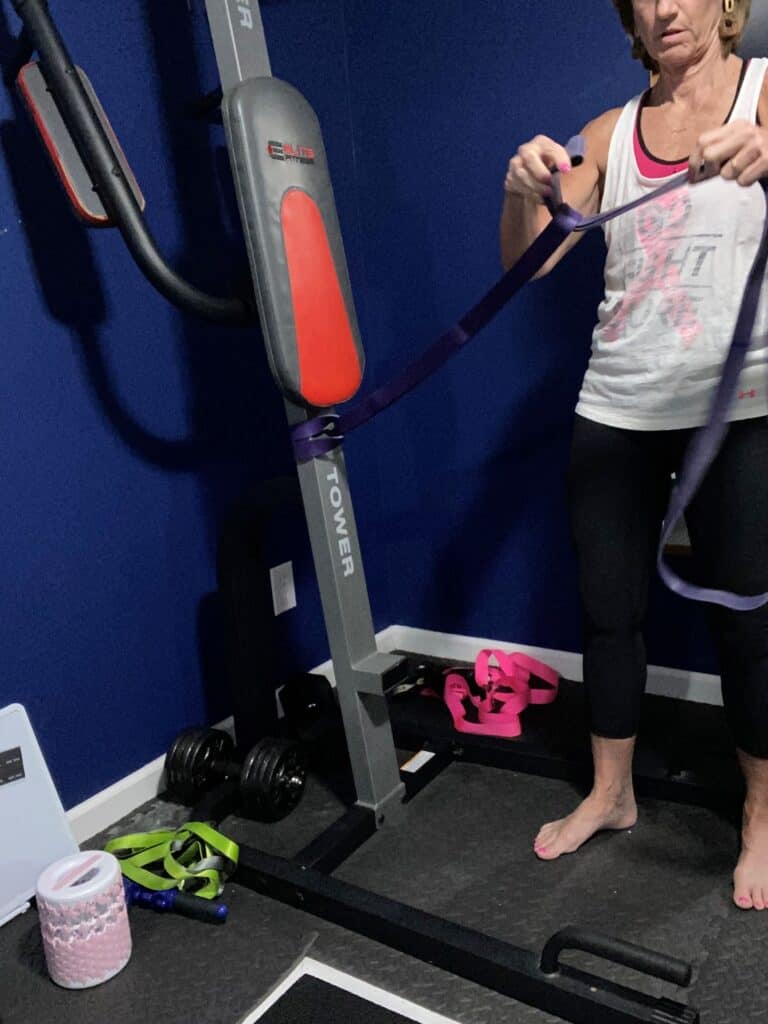
If you like to do running drills, one band may not be enough. This is no problem. You just need to tie two loop bands together.
- Start out by tying the loop band around a stationary object like above.
- Then take another loop band and loop it around a similar band the same way that you tied it around the pole.
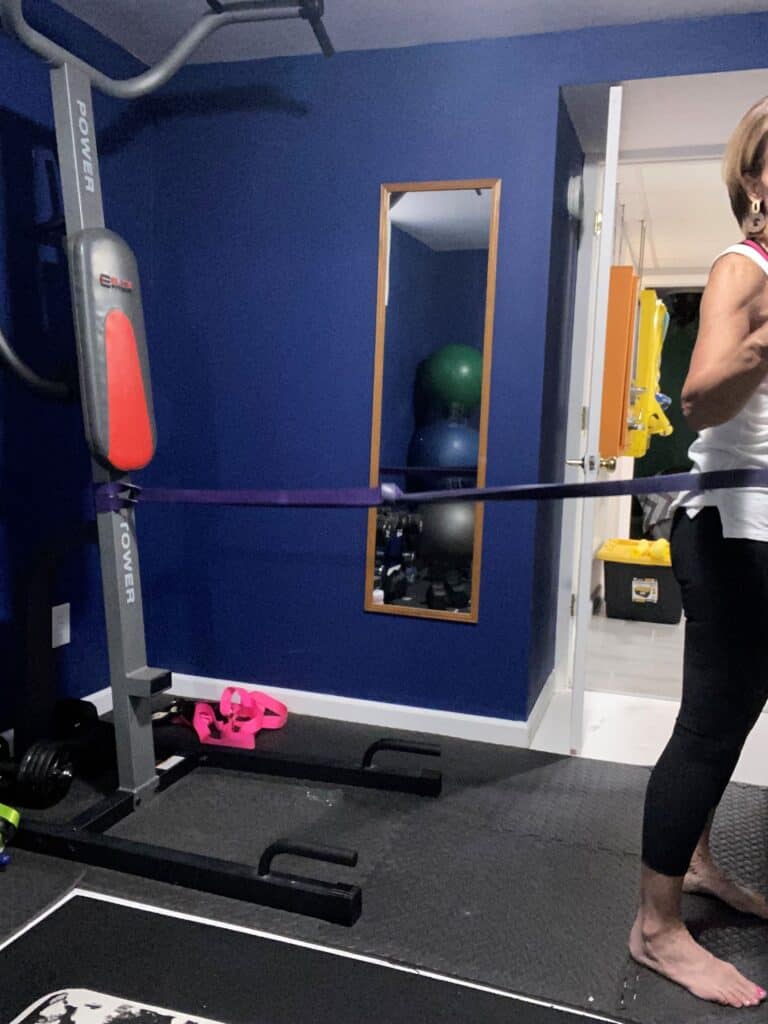
Best Way To Tie Resistance Bands To Door
Using door anchors is really one of the best and safest ways to secure your resistance bands and get a full range of motion workout.
I mean, everyone has a door, right?
These anchors secure quickly and easily.
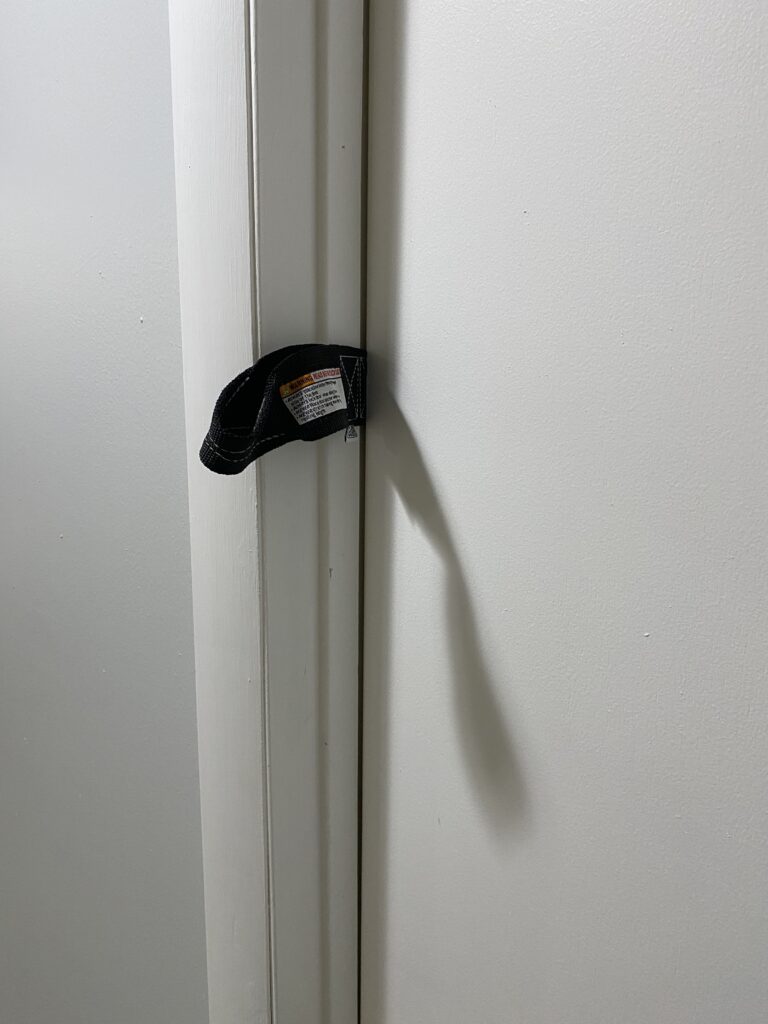
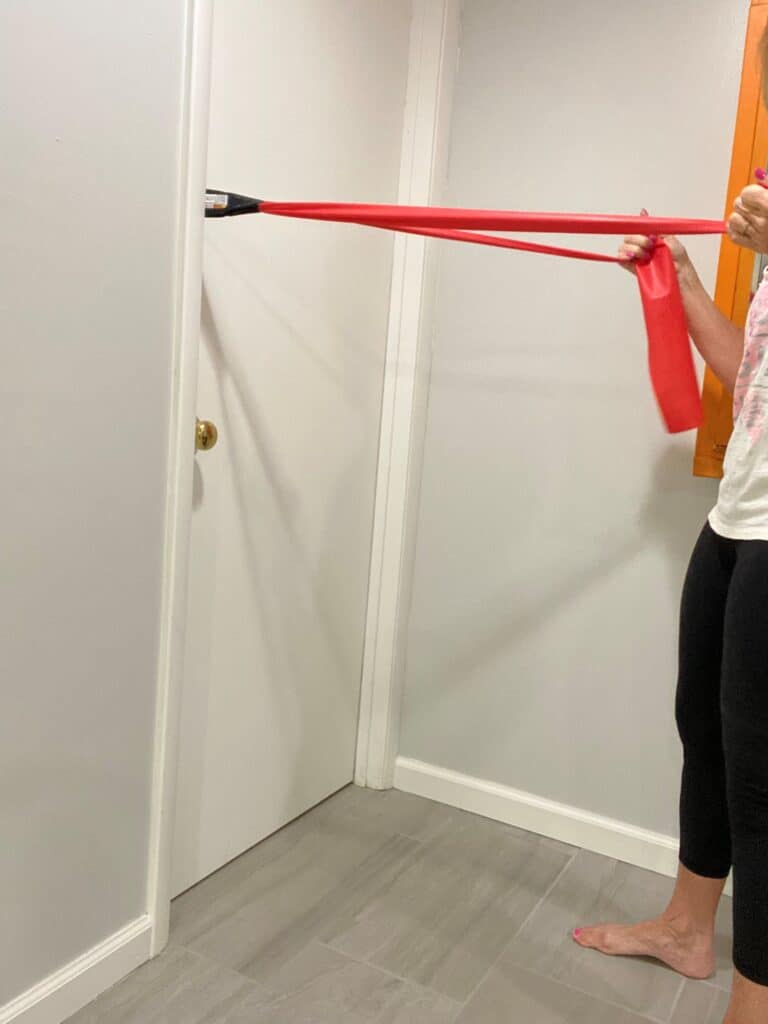
- You would just put the door anchor into the door.
- For safety, put it on the outside of the door so that it does not swing open towards you when you pull on it.
- Loop the band into the door anchor and you are all set.
READ MORE: How to Correctly Use Resistance Bands For Beginners.
Using Resistance Bands with Dumbbells
Combining resistance bands with dumbbells can really increase the intensity of your workouts.
It causes constant tension throughout the movement.
To use them together, loop the band around the dumbbell and adjust the length to suit your strength level. This technique is beneficial for exercises like squats, shoulder presses, and chest presses.
Combining these two tools can challenge your muscles in new ways, making your workout even better.
Maintaining Your Resistance Bands
Here are a few tips on how to keep your resistance bands in good condition for a long time.
Proper Cleaning
Cleaning your resistance bands regularly is important to prevent dirt and sweat buildup, which can quickly destroy them.
Here are some tips on how to clean your resistance bands:
- DO NOT use any harsh chemicals or bleach on your bands, this will damage the material.
- Use a damp cloth or towel to wipe down your resistance bands after each use.
- If your resistance bands are particularly dirty, you can wash them with mild soap and water.
- Make sure to dry your resistance bands thoroughly before storing them.
Storage Tips
You need to make sure that you store your bands properly so that they last longer.
Here are some tips on how to store your resistance bands:
- Store your resistance bands in a cool, dry place away from direct sunlight.
- Avoid storing your resistance bands in a place where they can get tangled or crushed.
- A storage bag or container can help to keep your resistance bands organized and protected.
- Make sure to check your resistance bands regularly for any signs of wear and tear, like cracks or fraying.
Protecting your bands can help them last longer and prevent them from breaking in the middle of a workout!
Not to mention, who wants to keep buying new bands when a few minutes of maintenance will help them last a long time?
Why Is Tying Resistance Bands Correctly Important?
Body weight exercises are wonderful, but sometimes you just need more resistance than body weight – “If it doesn’t challenge you, it doesn’t change you”.
Resistance band exercises are a great way to up your workout game.
However, it’s super important to tie or anchor your bands correctly to decrease your risk of injury.
Finding the best ways to tie your resistance bands is important for getting the most out of your workouts.
If you’re worried about the band coming loose and smacking you, you can’t focus on the exercises that you are doing.
So, try out some of the different tying methods in this article and experiment with different tensions to find what works best for you.
Now that you’ve learned about the different ways to tie resistance bands, don’t forget to share this blog post with your friends and fellow fitness enthusiasts on social media.
